Showing posts with label home. Show all posts

Monday, February 25, 2013

Weekend Warriors: Automating Sprinklers

Okay everyone...I have a confession to make. I, Mrs. Honda, am not good at taking care of plants. I am so terrible at taking care of plant life that when we were looking for homes to buy. I immediately vetoed homes with too many flowers or bushes or trees. In fact, Mr. Honda bought me a pink orchid plant for my birthday last year - in less than 2 months I turned the beautiful plant blooming with orchids into a stick in a pot due to a lack of watering.

Needless to say, this has left most of the gardening at our home up to Mr. Honda. Every couple of weeks he goes out and mows the grass and pulls up the weeds. He's actually quite good maintaing the plant life we have. However, even with the best intentions we forget to water our grass and plants regularly. It's really not our fault though. You see, even though our front and back lawns are equipped with a sprinkler system it lacks the automated feature we need for our busy lives. In the morning we're busy with the hustle and bustle of getting ourselves presentable for work and by the time we get home we're so tired from our long day that we just want to relax on the couch with our favorite DVR'd TV shows. Okay...maybe it is our fault a little.

A couple of weeks ago hubs had some landscaping guy come out and do an estimate on how much it would cost to have our sprinklers automated and get an drip irrigation set up for our other plants. They quoted us a whopping $1800! Sheesh! That much just to automate our sprinklers and irrigate our plants? I mean a girl could easily buy 2 pairs of beautiful red soled Louboutins for that price. 

Instead of spending the big bucks on such a simple project hubs decided to enlist his dad and DIY the whole thing themselves. Thank goodness for his dad's help or else I would've had to be the helper - and I'm sure his dad's help is a lot more helpful than mine would've been. Instead I got to spend the morning having breakfast and hitting up the farmer's market with his dad's girlfriend. 

When I got back, hubs and his dad had gotten all of their parts and had started digging up a trench for the piping that needed to go in. (Boy am I glad I missed out on that part!) The plan was to set up 2 "zones" in the front yard - 1 to feed the sprinklers and 1 to feed the irrigation. In order to do so they needed to set up PVC piping for the 2 different valves which would control the flow of water for the 2 different zones. To make sure that we had good seals and didn't have any leaks between the joints of the PVC piping we used red hot blue glue. It's really amazing how fast this stuff bonded the pipes together.

Once they finished assembling the piping for the valves the next step was to piece together the PVC pipes to connect the main water source to the valves and the valves to the sprinkler system. Then it was simply a matter of wiring the valves up to the timer we mounted in the garage.

They chose to go with the Rain Bird SST Series Timer from Home Depot. This bad boy lets you set up 6 different watering zones and lets you individually schedule each zone as you please. It was pretty easy and straight forward to set up a basic watering schedule - which means hubs was able to set it up without even reading the instruction manual. We are very excited about being able to basically set it and forget it.

Next up, hubs will be working on getting the irrigation set up for the trees in our backyard so that we can connect them to our timer. I'm so glad we're getting this stuff out of the way since spring is on it's way and I'm almost sure we'd kill all of our grass and trees due to a lack of watering if it was left up to us alone. 

Thursday, January 24, 2013

Bathroom Remodel: End of a Saga

Well well well...after what seems like forever we have finally reached the end of our bathroom remodel saga. If you have no idea what I'm talking about, here's what you've missed : the plan, the demo, the guts, the details, and the fall backs.

BEFORE: guest bathroom
Let's start with the guest bathroom. This is what the guest bathroom looked like when we bought the house. Standard tub with yucky shower doors, ugly blue and white linoleum, and a terrible layout that was a grand waste of space.
AFTER: guest bathroom
And this is what our newly renovated guest bathroom looks like. As you can see the layout is much better than what we started with. We didn't want to spend a whole lot for this bathroom sine we figured we'd rarely use it. We decided to go with a standard tub insert and ended up getting the vanity for a steal since the shop had made an error on the size for someone else's custom vanity. As you can see the sun tunnel we had installed brings in an amazing amount of light. These pictures were taken without the bathroom lights on and no flash. Sometimes our friends actually turn the light on when they're trying to turn the light off because the sun tunnel makes them think the lights are still on. Oh, and please excuse the towels that are almost invisible due to the fact that they are the same color as our walls. I guess that's just what happens when you just tell your contractor to paint the walls any "warm color" that will match the tile. Apparently that's such a popular shade of golden brown that they make it for paint and towels.

BEFORE: master bathroom
Now, on to the master bathroom. As you may remember, our master bathroom was SUUUPER teeny tiny. No way that more than 1 person could use that bathroom at a time. And how could you forget the lovely commode that face right out the door...LOL.
AFTER: master bathroom
And here she is...Ain't she a beaut??? We went with a larger shower and no tub for the master bathroom because honestly...how often do you actually have time for a bubble bath? The shower doors we had to special order off Amazon since we couldn't find it at any of the hardware stores around here. Thank gawd we ordered them before Amazon started charging tax - so we were able to save a little there. After we had the contractors rip out the original seat in the shower they redid it perfectly so that even little ole me can sit comfortably on it without my legs dangling around. We decided on the 36 inch vanity instead of 48 inch so that it didn't feel so cramped. And the contractors were able to shift the vanity and lighting further away from the toilet so that there isn't any claustrophobic feelings while you reach for your toilet paper. With the remodel our bathroom space has probably doubled...ah-maze-ing! Best part of all of it is that you don't look directly at the person sitting on the toilet when you're lying in bed. Always a win when you're keeping the romance alive <3

So what's up next on the remodel train??? Kitchen, I hear you calling. Front yard, I know you're in need of some TLC too. I don't really know which home project we'll be tackling next, but hopefully it won't be as drawn out as this one was. Eh, who am I kidding?

Thursday, January 17, 2013

Bathroom Remodel: Almost There...Kind Of

Once we had chosen all of our little details things really started rolling on the bathroom remodel. We were very excited to soon be able to take a shower in our own house for the first time. And I'm sure our friends who were kind enough to let us shower at their place were just as excited to not have us trapsing through their home everynight like a bunch of vagabonds.

The contractors had painted, laid the tile and installed the bath in our guest bathroom. And they had painted, laid the tile, installed the shower, and started tiling the shower in our master bathroom. It was like we could see the light at the end of a tunnel that was much longer than we had anticipated.

But then (isn't there always a but?), we ran into several snags that made the light at the end of our tunnel fade fast. We realized that the contractors had neglected some of our very specific requests like the distance between the toilet and the vanity as well as the height of the seat in our shower. If any of you know me personally, you know I'm a bit vertically challenged as some might say. At a measley 4'10" (on a good day) we took great care before starting the remodel to take measurements so that things would be a comfortable distance away for hubs yet not out of my reach.

We were so disappointed when we checked on our bathroom only to realize they mounted the shower seat way too high. We had to force the contractors to rip out the mounted seat which ruined several of our expensive marble shower tiles...sad face.

Then we saw where they planned to set the vanity which would have put the toilet paper holder much too close too the toilet. When we asked the contractors to move the vanity over we were faced with the problem that there wouldn't be enough clearance for the bathroom door. So naturally we had to have the contractors move the door frame to accommodate moving the vanity.

It ended up costing a lot of extra dollars, but hubs and I both agreed that since we're already spending so much on the remodel we should do whatever it takes to make sure we're completely happy with the results.

Sunday, January 13, 2013

Bathroom Remodel: Details, Details, Details

Well...well..well. It's been about 3 months since the last bathroom post and it's probably been about 4 months since the bathroom has been completed...it may be an understatement to say I'm a little behind in my blogging. Anyway, let's dive right back into our series on our epic bathroom remodel.

With most of the demolition work done in the bathrooms it was time for us to start making decisions on what we were going to put in our new bathrooms. We needed to choose tile, lighting, vanity, sink, tub, and all of the sink and shower hardware. We had a lot of decisions to make and a lot of decisions to make fast. Looking at all the different options was overwhelming to say the least.


I feel like we went to a hundred tile stores and looked at a million different kinds of tile. Luckily we had  the hubs brother to give us his expert opinions of what types of tiles would look good in the shower and the floor. I'm pretty sure he was ready to punch me in the face since I probably started to sound like Goldie Locks... "This tile is too dark"..."This tile is too light"..."This tile is too shiny"..."This tile feels too scratchy." Luckily I have a kind brother-in-law and he refrained from strangling me during our tile shopping adventures.

Choosing a vanity was no easier. We weren't really too worried about what was going in the guest bathroom since in all honesty how often would we even be in there. But in the master bathroom we went back and forth between a 36 inch vanity and a 48 inch vanity. We were worried there wouldn't be enough counter space for the two of us with a 36 inch vanity but we weren't sure if the bathroom would feel too crowded with a 48 inch vanity.

And oh my goodness...who knew there were so many different types of lighting fixtures? And not only do you have to choose the lighting fixture in some cases you have to choose the shade to go with the fixture. After a while I think they all started to look the same.

And let's not forget the faucets and shower fixtures. And you can't just choose a style you have to choose a finish too! Oh, but remember, the finish of your fixtures need to match the finish of your lighting fixtures and other bathroom hardware (ie: towel racks and toilet paper holders).

Needless to say we eventually made our decisions, but I had no idea it would be so difficult to pick out the things we wanted. *whew* Boy were we glad when that part was over.

Want to see where we started? Check out the plan, the demo, and the guts of our bathroom remodel.

Sunday, October 14, 2012

Bathroom Remodel: Underneath it All

So when we last left you we had just finished the bathroom demo. Next up, moving all of the plumbing and electrical to accommodate the new layout.

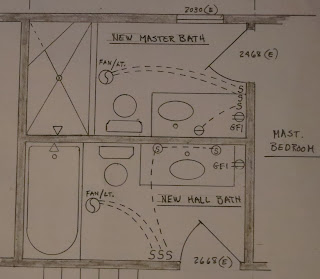
If you take a look at the plans for the new bathroom layout you can seen that the 2 bathrooms are practically mirror images of each other. Apparently this made things much easier for moving the plumbing and electrical since both bathrooms could share the same main plumbing and electrical.

So here's some pictures of the work that they did to accommodate the new bathroom layouts. First they moved the plumbing to the wall that both bathrooms would share. Then they started framing in the wall - I have to admit seeing the two empty bathrooms made me pretty nervous that the bathrooms would still be impossibly small.

We also decided to add a sun tunnel into each bathroom. Originally we were planning on only adding one to the hall bathroom to make up for the fact that it wouldn't have a window anymore. But after seeing how nice the results were we decided we should get one for the master bathroom too. BEST.DECISSION.EVER.

Next up, picking out all the little details like tile, lighting fixtures, and vanities.


Want to see where we started? Check out the plan and the demo.

Friday, October 5, 2012

Bathroom Remodel: Demo Days

The day after we met our contractor and okay'd the plans for the bathroom remodel they got down to work and started doing demo. If you've ever watched HGTV I think you'd agree the demo looks like you just go around ripping things off the wall and knocking walls down with sledge hammers - both fun and fast. Apparently this is a misconception (damn you Property Brothers!)


After demo day 1 they had removed the walls separating the 2 bathrooms and taken out all of the bathroom goods like the toilets, tubs/shower, and sinks. We had them try to salvage as much of the stuff from the bathrooms as possible. In the end we were able to reuse the toilets from both bathrooms (yay savings!) and we saved the pedestal sink, cabinets, and bathroom hardware (ie: towel bars and toilet paper holders) which we were able to sell at a garage sale we just had.

At the end of demo day 2 they had pulled up all of the flooring and ceiling. They also patched up one of the windows that would have ended up in the middle of our new master shower.

I couldn't imagine that demo took our crew a whole 2 days to complete. But I guess things aren't really as easy as they seem on television. That seems to have been a reoccurring theme throughout the entire bathroom remodel.

Next up, moving all the plumbing and electrical to accommodate the new bathroom layouts.

Want to see where we started? Check it out.

Saturday, September 15, 2012

Weekend Warriors: Baseboards Edition

This was the first of many weekends to come dedicated to home improvements. This weekend's project of choice was replacing the current baseboards. Luckily there are a lot of handy people in the hub's side of the family to help us. And no one will do a better job of making sure your home looks great than family (since every time they come to your house they'll be forced to look at their handy work).

Our home was blessed with several different styles of baseboards depending on the room you're looking at. Not to mention that some of the areas were in pretty poor condition - missing pieces or falling off. At first we considered just repairing the baseboards that we already had but after a jaunt at my new favorite store, Lowes, we decided to go with a much more ornate baseboard. It was more costly than just repairing what was already there, but since we'd like to add crown molding at some point we figured a more ornate  baseboard would just jive better.

The goal was to get remove all current baseboards, install new baseboards, and paint new baseboards in a weekend before carpet was to be installed. This all seemed like a completely reasonable list to complete in 48 hours, but I was wrong (I'm finding that my idea of how long home projects will take and how long they actually take are never in line with each other). We really needed to get it all done before we had the new carpet installed.

DAY ONE:
The hub's family arrived bright and early with all their handy dandy tools and got right to work. The guys started pulling out the old baseboards and the women folk followed behind pulling out or hammering in any wayward nails and evening out the wall in preparation for the new baseboards. It's amazing the kind of stuff we found under the baseboards - old paint, old wallpaper, and even even a paint brush. Then the new baseboards went in. Apparently a lot more thought goes into installing baseboards then I could've ever imagined. They installed the base boards a little higher than the hardwood floors since we were installing carpet the following weekend. Now that the carpet is installed we don't lose the look of the full base board. Genius right??? I know.
The next challenge of the day was dealing with the baseboards for the entrance between the dining room at kitchen. For some reason the tile in the kitchen is a lot higher than the rest of the flooring. *shrugs* Add that to the growing list of many strange things about this house. Luckily the hub's brother was able to come up with a creative and beautiful solution.

At the end of a terribly long day we successfully installed and caulked the baseboards throughout the house and I learned how to use a nail gun. Okay, I only used it once - but that totally still counts.

DAY TWO:
The second day of our baseboard adventures was tackled by just the hubs and myself.We went through and painted all the baseboards in the house. I figured it wouldn't take more than half the day to paint all of them. I mean they're not even 3 inches tall and we weren't going tape any of it off with painters tape since we plan on repainting anyway...how long could it take to paint such a small thing? Well, the answer to that is a very long time. So long, in fact, that after a whole day of painting we had only completed the 3rd level.

FYI...painting a home with your significant other will teach you a huge deal about them. I am a details kind of person. I wanted to make sure that the baseboards were perfect and well painted. On the other hand the hubs is more of a big picture kinda guy. His forte seems to be painting large expanses like ceilings and walls. Guess it just goes to show you that we really do complete each other (did you just barf in your mouth a little?)

DAY TWO AND A HALF:
Since we didn't finish painting all the baseboards over the weekend - weekend warriors FAIL - we had to come back during the week to finish painting the baseboards in the main level and the bonus room. While painting the main level we got ambitious and thought it might be a good idea to try and tackle the eye sore that is our fireplace. Our fireplace was probably once a beautiful brick...and then it got painted...brick red. Why anyone would paint bricks brick red is really beyond me. We decided to just dip our toes in the water and paint the outer mantel the same color as our baseboards hoping it would make the painted bricks look less harsh. I'm still not satisfied with the results. I think we'll probably paint the bricks white too. What do you guys think?

All in all even though we didn't exactly finish our project in 1 weekend I'd say it was a success. I love the baseboards and we got everything done just in time for the carpet to be installed. Whew! These home projects are a lot more time consuming then I originally anticipated. Looks like I'm going to have to work on my patience skills when it comes to all the projects I want to tackle in this house.


Friday, September 14, 2012

Don't You Hate It...

When you realize you should have caulked something AFTER you've already painted it? UGH!

Thursday, August 23, 2012

Exhausted (And it's Only Thursday)

Oh man oh man...it has been an exhausting few days trying to get things ready for the big move to the house this weekend. Last weekend we labored on our hands and knees installing and painting new baseboards throughout the house. And this week we've dropped by the house every day to either drop more boxes off, finish painting, and send good juju-vibes so that the bathroom renovation to be done in time for the move. Although we haven't been very successful with the later. On Saturday we'll be having our new carpet installed throughout most of the house - minus the areas that construction workers will be walking through. And Sunday will be the final big push to move everything out of the apartment and into our very first home.

I don't know how we're going to make it through this next couple of weeks. I think we're both running on fumes at this point. Guess we're just going to have to stock up on the coffee and Mountain Dew (the preferred caffeinated beverage of the hubs). Wish us luck!


Thursday, August 9, 2012

The Death of Luxury

That's exactly what homeownership is feeling like right now. It wasn't long ago when I'd come home from work and lust over luxury handbags and shoes while watching Say Yes to the Dress or Real Housewives of this or that (please don't judge me and my trashy shows). Now I come home and drool over farmhouse kitchen sinks and bathroom tiles online. I run my fingers and toes obsessively through different carpet samples while wrestling with the decision of what color will look best with what wall color. All while HGTV is the permanent television channel of choice. Will this ever change???

It looks like, at least for now, my friends Jimmy Choo and Chanel will have to wait.

Sunday, August 5, 2012

Homeownership

This past week the previous owners of our house moved out and we got a chance to see the blank canvas that is our first home. It was exciting to walk into the home we had walked through so many times and see it empty and waiting for us to make it our own.

Sometimes it's still hard to believe that we own a home. It probably has to do with the fact that we're still living in our apartment. Over the next month we'll be slowly moving into the house as we do some major renovations to our bathrooms before we officially call it our home. More about the renovation in another post.

This weekend we went back to the house a few times to drop off some of the things we've already packed up. And most importantly we brought hub's second car out of storage and gave it a proper home in our garage. We've only been homeowners for a few days and the hubs is already loving his new 2 car garage.

It's an exciting time for us and we can't wait to be fully moved in and living in our home. Hopefully everything goes according to plan and we'll be all settled in soon.

Tuesday, July 31, 2012

It's Official

As of today Mr. Honda and I are proud homeowners! Our road to homeownership has been a long one and quite an interesting one at that. Luckily we had a great team of people backing us up each step of the way.

When we got back from the wedding we began entertaining the idea of moving from our current apartment. I wanted to stay near the city and move into a luxury apartment where we could have the amenities of a home (ie: in-unit washer/dryer and pets) without the responsibilities of owning a home (ie: home insurance and more utilities). On the other hand the hubs has been missing the amenities of suburban living (ie: 2 car garage and easy parking). After weighing the pros and cons I agreed to start looking at houses, though I admitted that it would have to be an amazing house for me to get fully on board with buying a house. Honestly, I think I really just couldn't fathom the idea that we could be buying a house less than 6 months after our wedding.

We went to a few open houses on our own here and there and nothing even came close to making me want to buy a house. Then on our first official day out with our real estate agent, who just happens to be the hubs' mom, we came across the PERFECT home. Within moments of walking into the home I turned to the hubs and said "I want to live here." And now, about a month and a half later, I am happy to say that we own that home.